Import from Google Calendar™
By Nathan ColeUpdated
Routing24 can create orders from Google Calendar™ events with addresses. If you manage or collect appointments in Google Calendar™, Routing24 can create optimized routes for these orders. The event's location field becomes the order's address. The event's start and end time become the order's time window. Service time and opening hours can also be specified in the event description. Access is read-only: Routing24 reads events and never changes your calendar.
The screenshots on this page import one day of a service calendar: nine
events across two calendars, each with a customer address in its location
field and a Job: 30 minutes line in its description.
What an event becomes
| Event field | Becomes |
|---|---|
| Title | The order id (duplicates get a numeric suffix) |
| Location | The order's address, geolocated automatically |
| Start and end time | The order's time window (the default option) |
Job: 30 minutes line in the description | The order's time on site (optional) |
Open: 8am - 6pm line in the description | The order's time window (optional) |
Only events with a location import. Events without one are skipped, so a work calendar that also contains meetings imports cleanly. An all-day event has no start and end time, so it imports without a time window.
Run the import
On the Home page, find the From Google Calendar™ card and press Import calendar.
The first time, Google asks you to approve read-only access to your calendars in a standard consent popup. Then the import dialog opens:
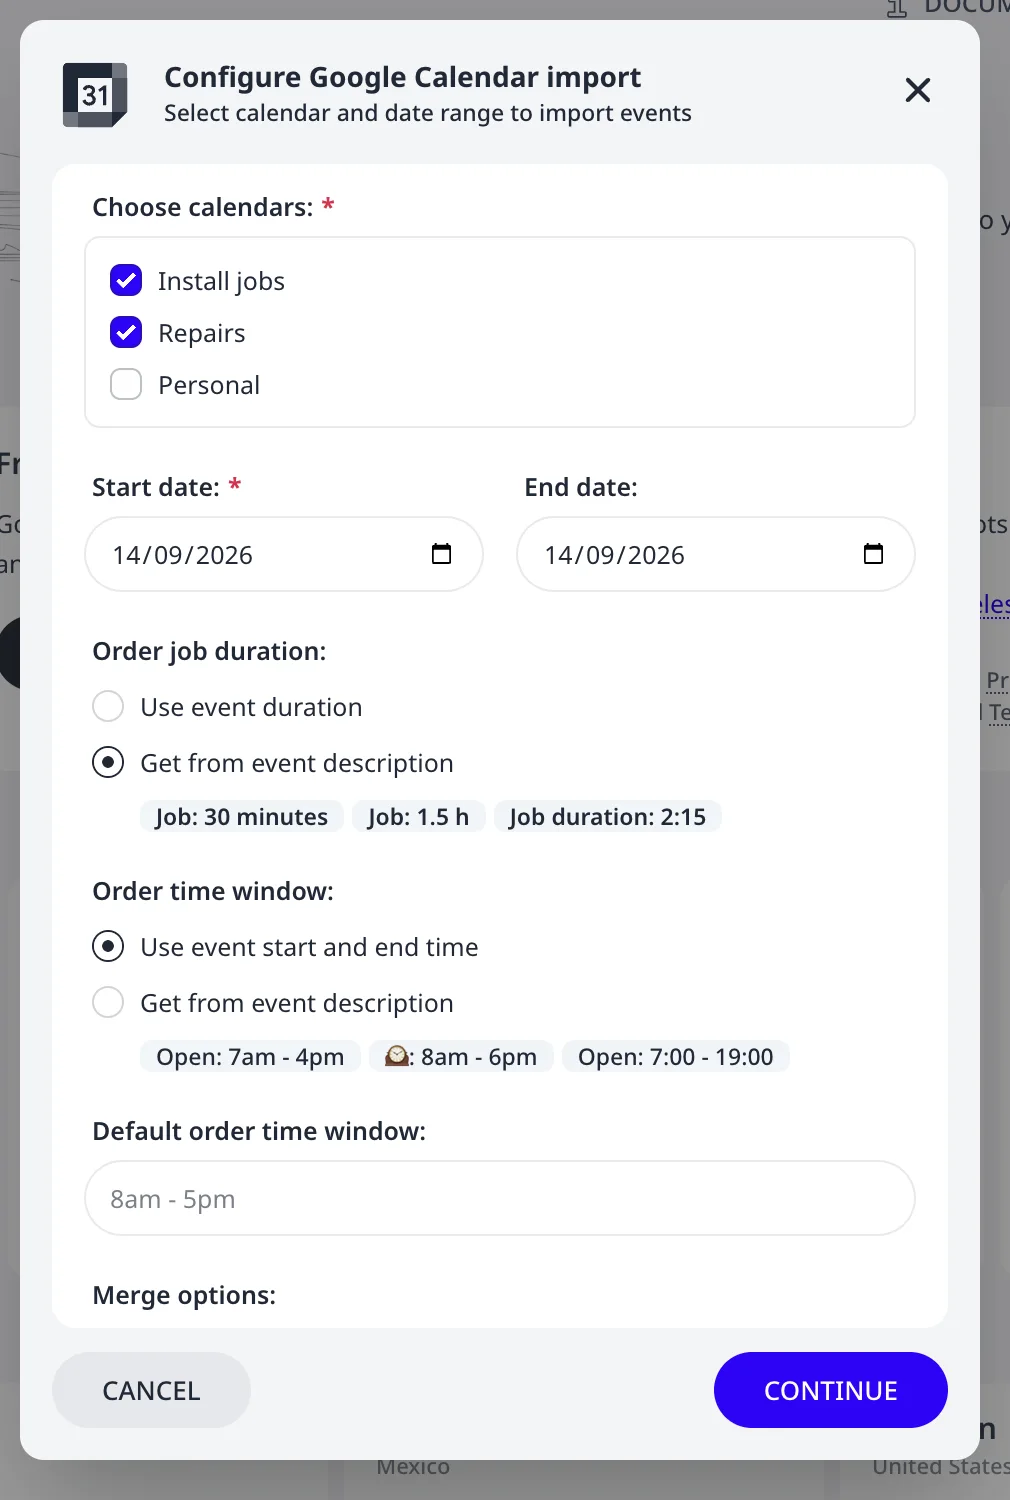
- Choose calendars: tick the calendars to read. Events from all ticked calendars import together.
- Start date and End date: the days to import. One day builds a day plan; a range imports every event in it.
- Pick how the job duration and the time window are specified. The two options for each are covered next.
- Press Continue.
Job duration
Order job duration decides how long the driver stays on site:
- Use event duration: the time on site equals the event's length. Pick this when your events are as long as the visit itself, for example a 45-minute cleaning appointment.
- Get from event description: the time on site can be specified in the
event description, with a line such as
Job: 30 minutes,Job: 1.5 h, orJob duration: 2:15. Pick this when the event blocks the whole arrival slot. A10:00 - 13:00event withJob: 30 minutesmeans "arrive between 10 and 13, stay 30 minutes", which lets the optimization plan several visits inside overlapping slots.
Time windows
Order time window decides when the driver may arrive:
- Use event start and end time: the event's own times are used as the window. This is the default and fits calendars where each event marks an agreed arrival slot.
- Get from event description: the window can be specified in the event
description, with a line such as
Open: 7am - 4pm,Opening hours: 8am - 6pm, orOpen: 7:00 - 19:00. Events without such a line get the Default order time window from the dialog (8am - 5pm unless you change it).
Merge options
By default each import starts a new plan. You can add the imported orders to the open plan instead: tick Append imported data to current plan. With appending, one plan can collect orders from several imports before a single optimization:
- Several calendars, one run: you can tick more than one calendar in the dialog; their events import together, with no appending needed.
- Several date ranges: you can run the import again with another start and end date, with append ticked. The new days' events join the same plan.
- Different options per calendar: you can run the import once per calendar, with append ticked and different options each time. One run can use event times as the windows while another reads them from the descriptions.
Appending follows three rules:
- An order whose id the plan already has is skipped. The existing order is kept, and the report lists each skipped one. Re-running the same import after new events appeared in the calendar therefore adds only the new events.
- An address the plan already has is reused, not duplicated.
- Your existing vehicles are kept. The default vehicle is created only when the plan has none.
After the last append, press Optimize once: all collected orders are planned together.
The review report
The import ends on a report. Nothing changes until you accept it.
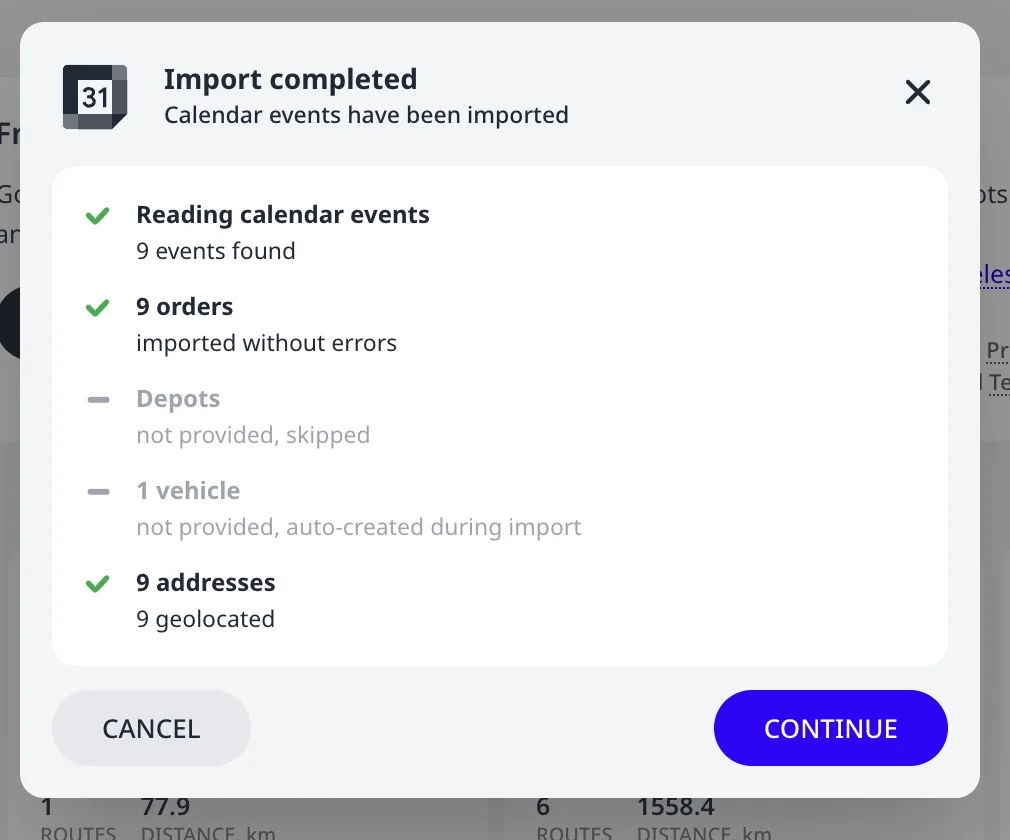
- Orders: one per imported event, with skipped events counted.
- Addresses: how many locations were geolocated. An order whose location was not geolocated shows a NOT GEOLOCATED badge on the Orders page: see Fix unrecognized or mislocated addresses.
- Depots are never provided by a calendar. Add a start location on the Depots page afterwards if your route starts from a fixed place.
- Vehicles: one default vehicle is auto-created, since a calendar has no fleet. Adjust it on the Fleet page.
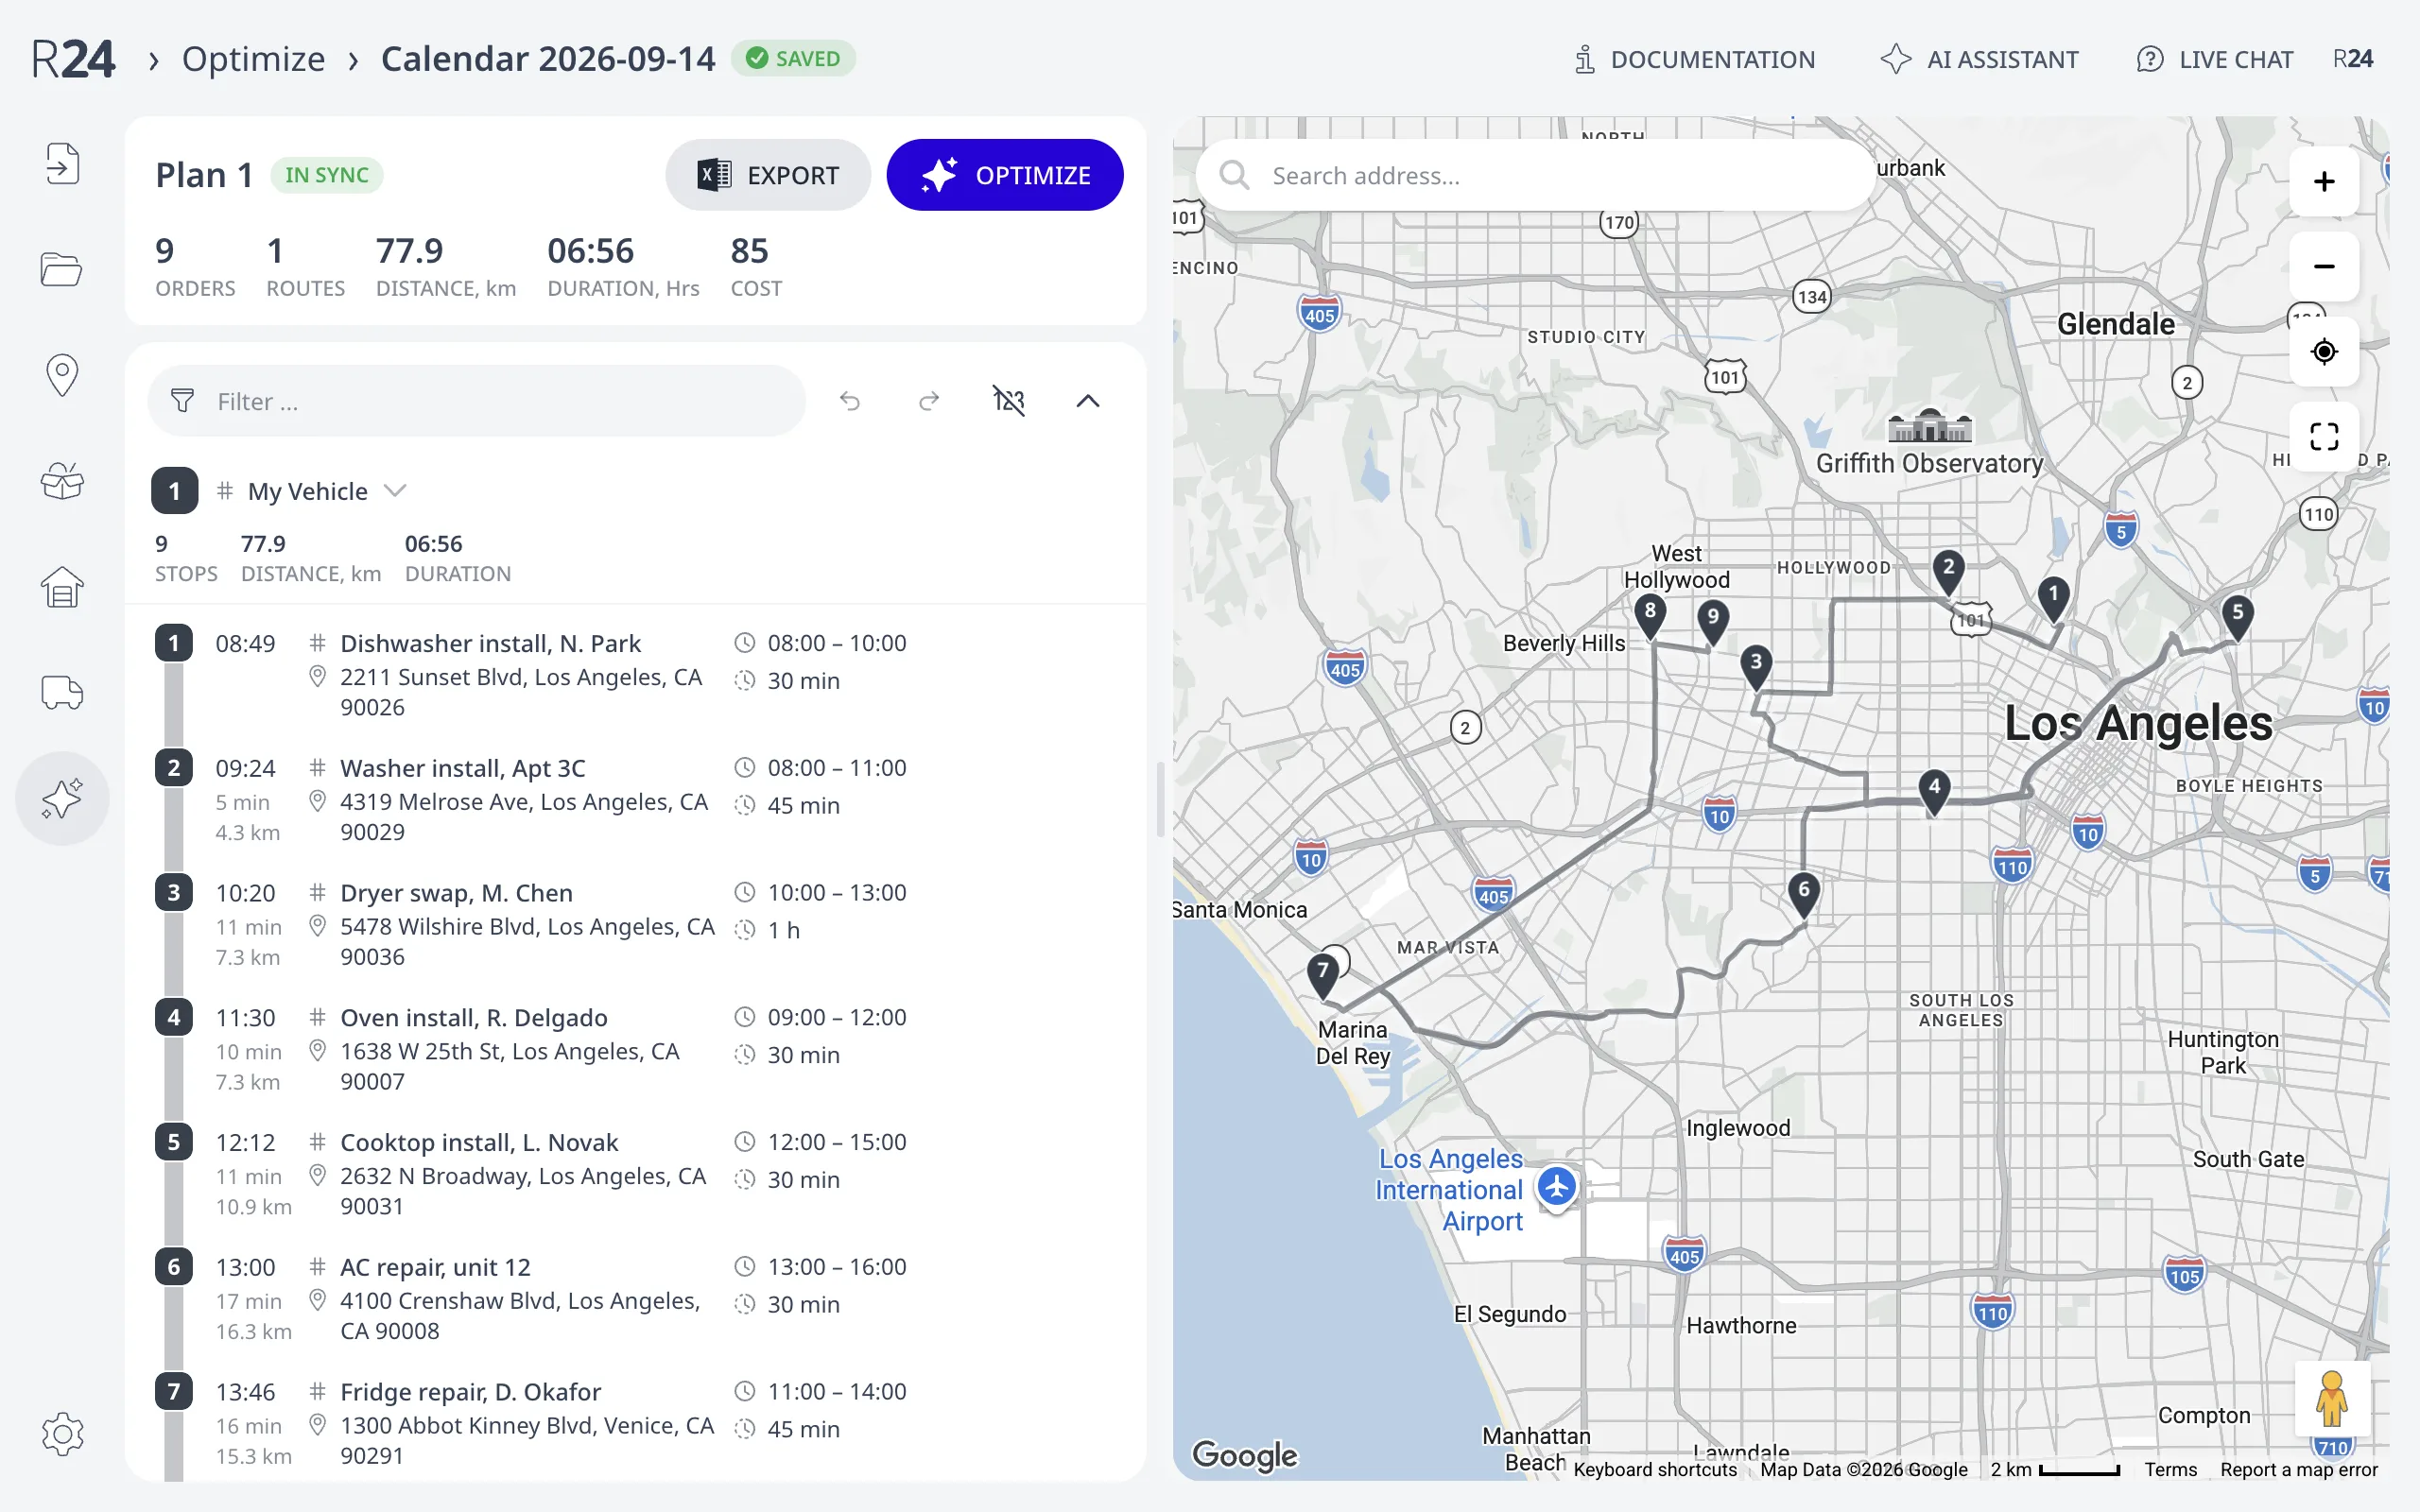
Continue accepts the import into a new plan named Calendar plus the date range, for example "Calendar 2026-09-14". With append ticked, the orders join the open plan instead. Cancel discards the import.
From events to routes
Press Optimize on the optimization page. Each imported order's time window and service time constrain the optimization, so every arrival is planned inside its event's slot:
Next step
Time windows, service time, and the other per-order fields the import fills are described in Time windows, service time, priority, and load.
FAQ
How do I import Google Calendar™ events into Routing24?
On the Home page, press Import calendar on the From Google Calendar™ card. Approve read-only calendar access in the Google popup, pick one or more calendars and a date range, and press Continue. Every event with an address becomes an order, and a review dialog reports the result before the plan changes.
Which calendar events import as orders?
Only events with a location. The event title becomes the order id, the location becomes the address and is geolocated automatically, and the event date and times become the order's time window. Events without a location are skipped, so a calendar can mix visits with other appointments safely.
How do I set the job duration for imported calendar events?
Two ways. Use event duration makes the time on site as long as the event itself. Get from event description reads a line such as "Job: 30 minutes", "Job: 1.5 h", or "Job duration: 2:15" from the event description, which keeps long arrival windows separate from short jobs.
Can Routing24 read time windows from the event description?
Yes. Choose Get from event description under Order time window, and add a line such as "Open: 7am - 4pm" or "Open: 7:00 - 19:00" to the event. Events without such a line get the Default order time window from the dialog, which is "8am - 5pm" unless you change it.
Does calendar import replace my current plan?
By default the import starts a new plan named Calendar plus the date range, and creates one default vehicle since a calendar has no vehicles. Tick Append imported data to current plan to merge the events into the open plan instead; appending keeps your existing vehicles rather than creating another one.