Timeline view: route and stop schedules
By Nathan ColeUpdated
Timeline view shows routes over time in place of the map on the Optimize page. This article covers route and stop lanes, time windows, selection, zoom, scrolling, and manual edits.
The examples use the Time windows plan with 12 orders, 2 vehicles, and 1 depot:
Map and timeline views
Timeline view replaces the map with the timeline. Map view restores the map. The routes list keeps its expanded routes and its scroll position in both views.
Route lanes
Each route has a lane showing its schedule from the start depot to the end depot. The lane arranges driving, waiting, and service in sequence. For example, in the screenshot, Van 1 leaves the Warehouse depot at 10:36 and returns to it at 12:14. The lane uses the route's color, matching the route's line in the list and on the map.
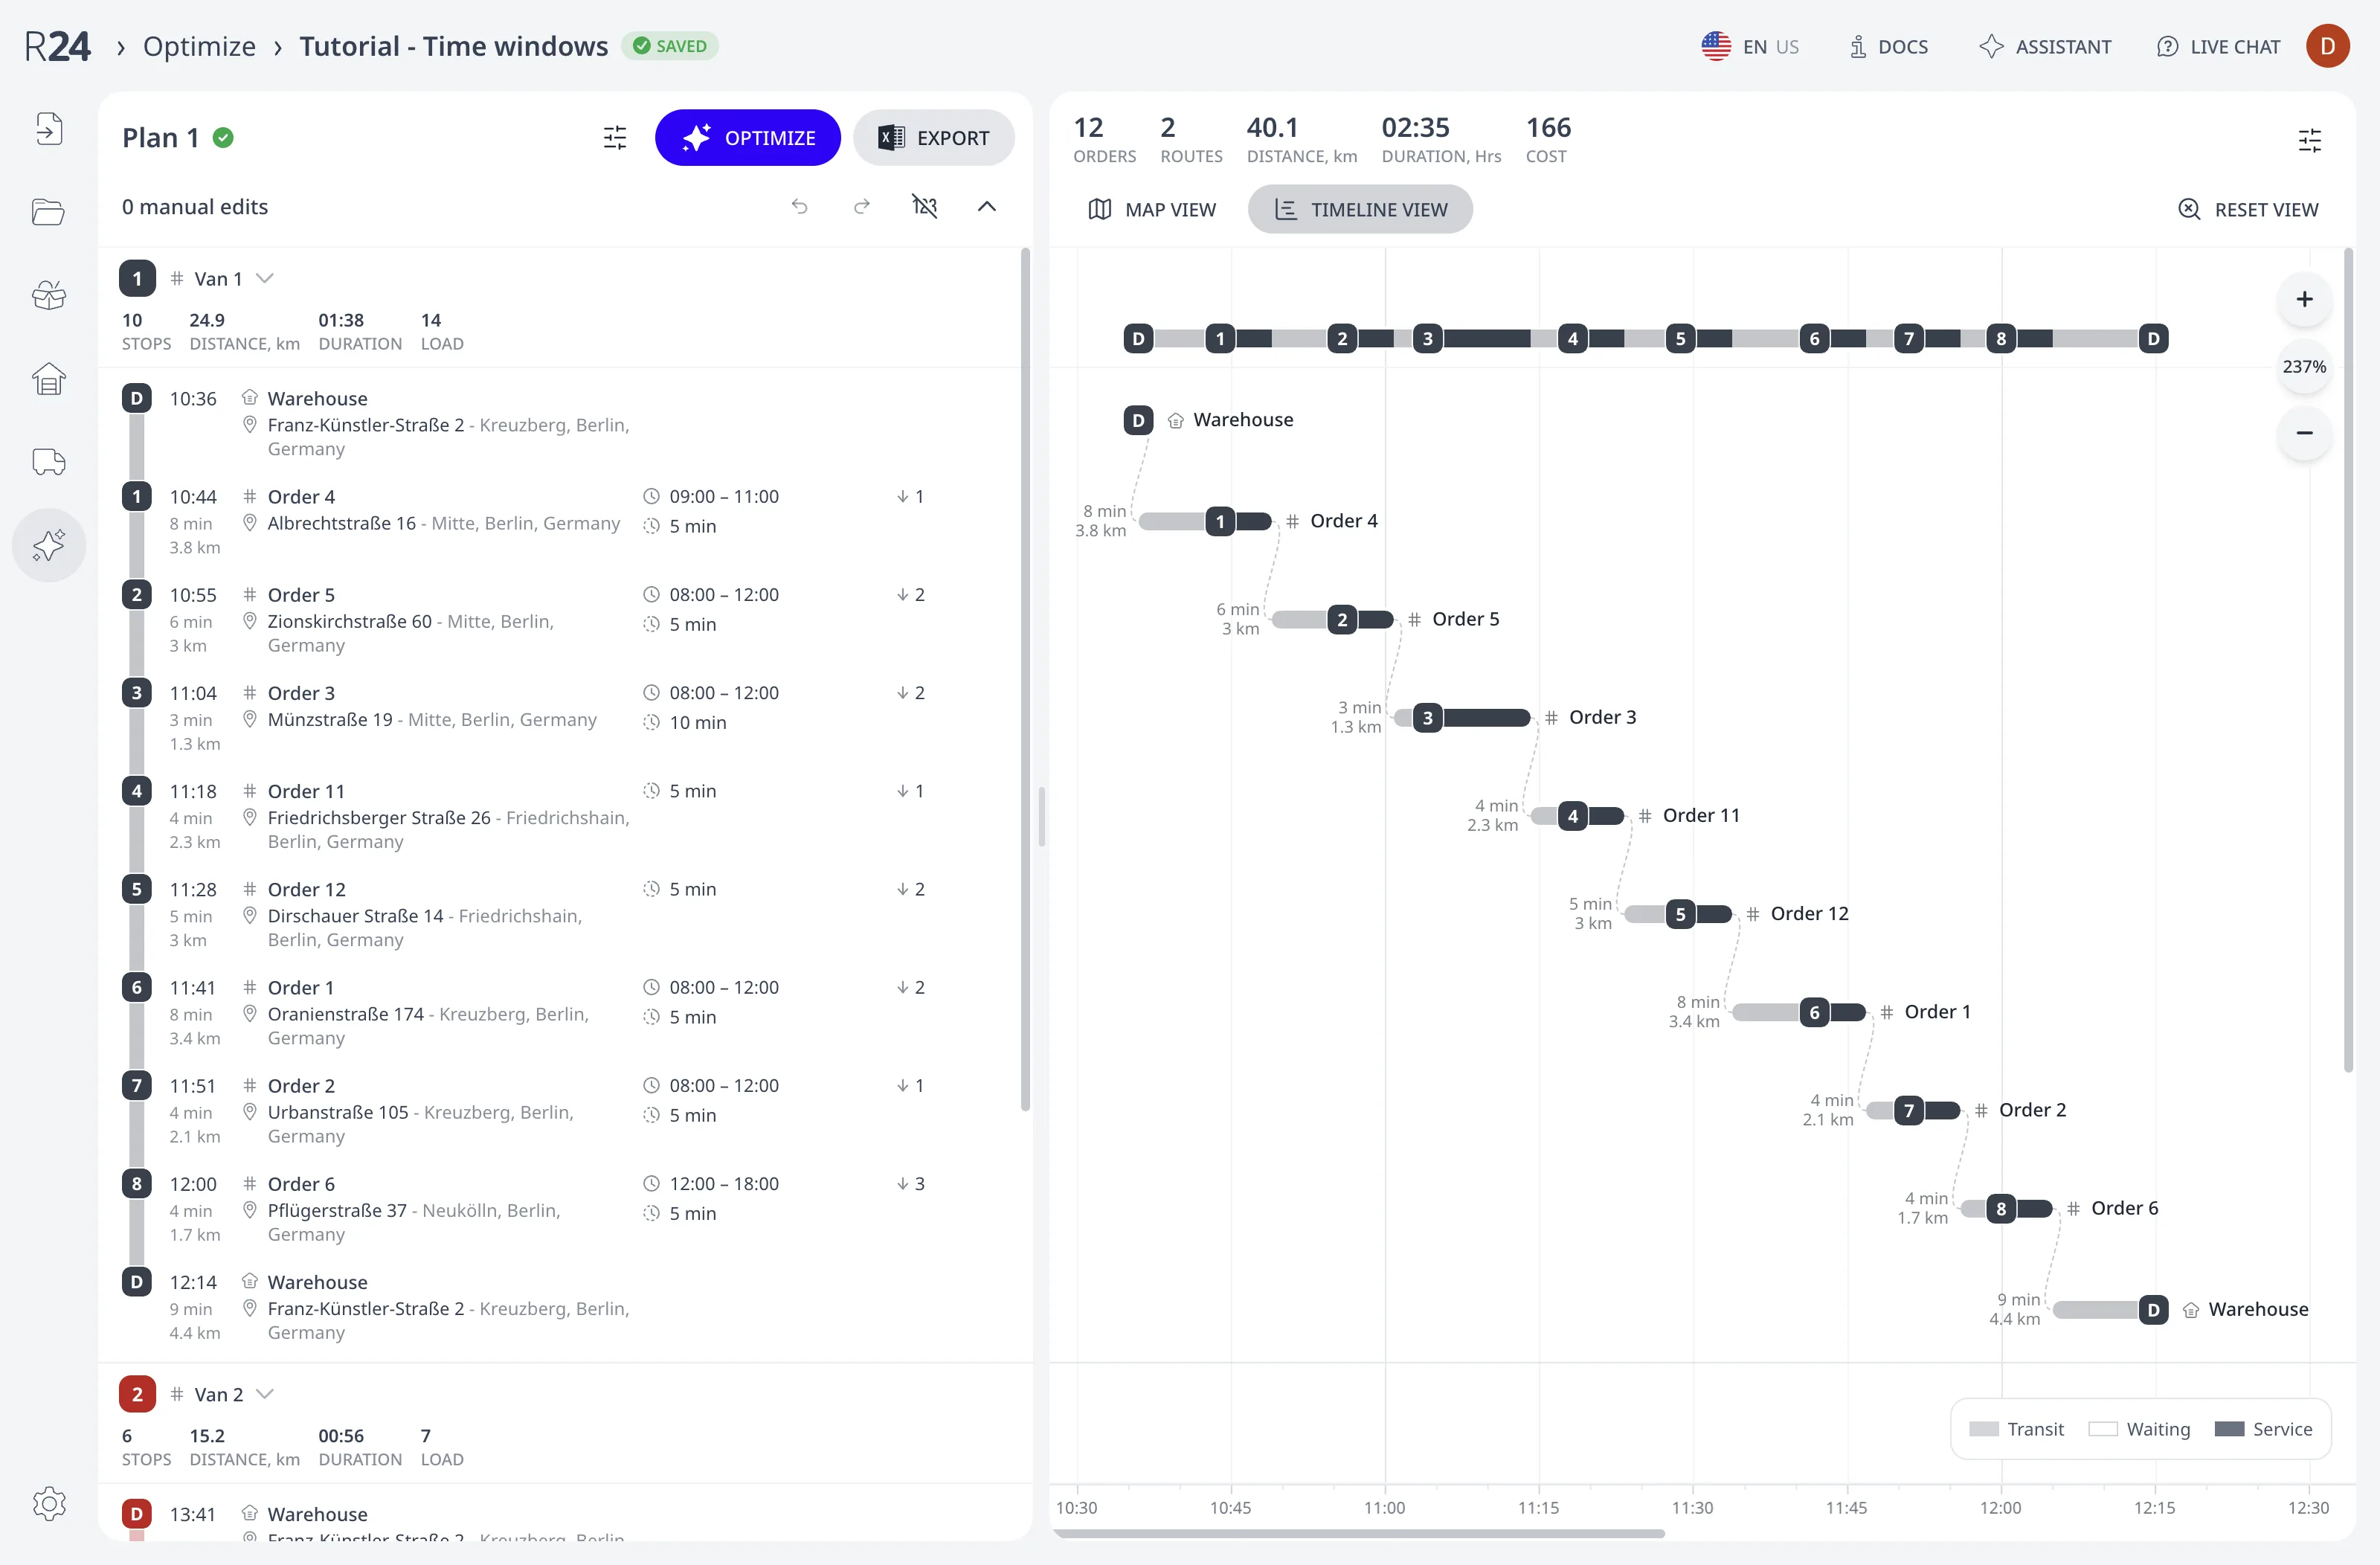
The legend identifies three kinds of time span:
- Transit represents driving between two stops.
- Waiting represents waiting at a stop for its time window to open.
- Service represents service at the stop.
A hatched span represents a driver break. The break rules are described in Driver breaks and driving-time limits.
Each stop badge marks the start of service. Its number matches the stop number in the list. Depot badges show D. When badges would overlap, the timeline displays only those that fit at the current zoom. At higher zoom levels, the timeline shows badges that did not fit.
Time scale
The horizontal axis represents time of day. The time scale uses the 12-hour or 24-hour format set by the plan's locale. For routes that continue past midnight, the midnight tick also shows the day.
A vertical line follows the mouse over the timeline. The time scale shows the time at that line.
Stop lanes
An expanded route has one timeline lane for each stop row. Each lane shows the drive to that stop, its waiting and service spans, and its number badge. Dashed lines connect consecutive stops.
Each stop lane shows the incoming drive's duration and distance, matching the values under ETA in the list. For example, in the screenshot, Order 4 has an arrival time of 10:44 after an 8-minute drive of 3.8 km.
The lane shows the # icon and the order id, as in the list row. The timeline truncates an id wider than 100 pixels with an ellipsis. A depot lane shows the depot icon and depot id. A break lane shows the break's duration.
Unassigned orders and unused vehicles have no timeline lanes.
Time windows and duration tooltips
While the mouse is over a stop row or its lane, the lane shows the stop's time window. The lane shows the window's start and end times. For example, in the screenshot, Order 4 has a time window from 09:00 to 11:00.
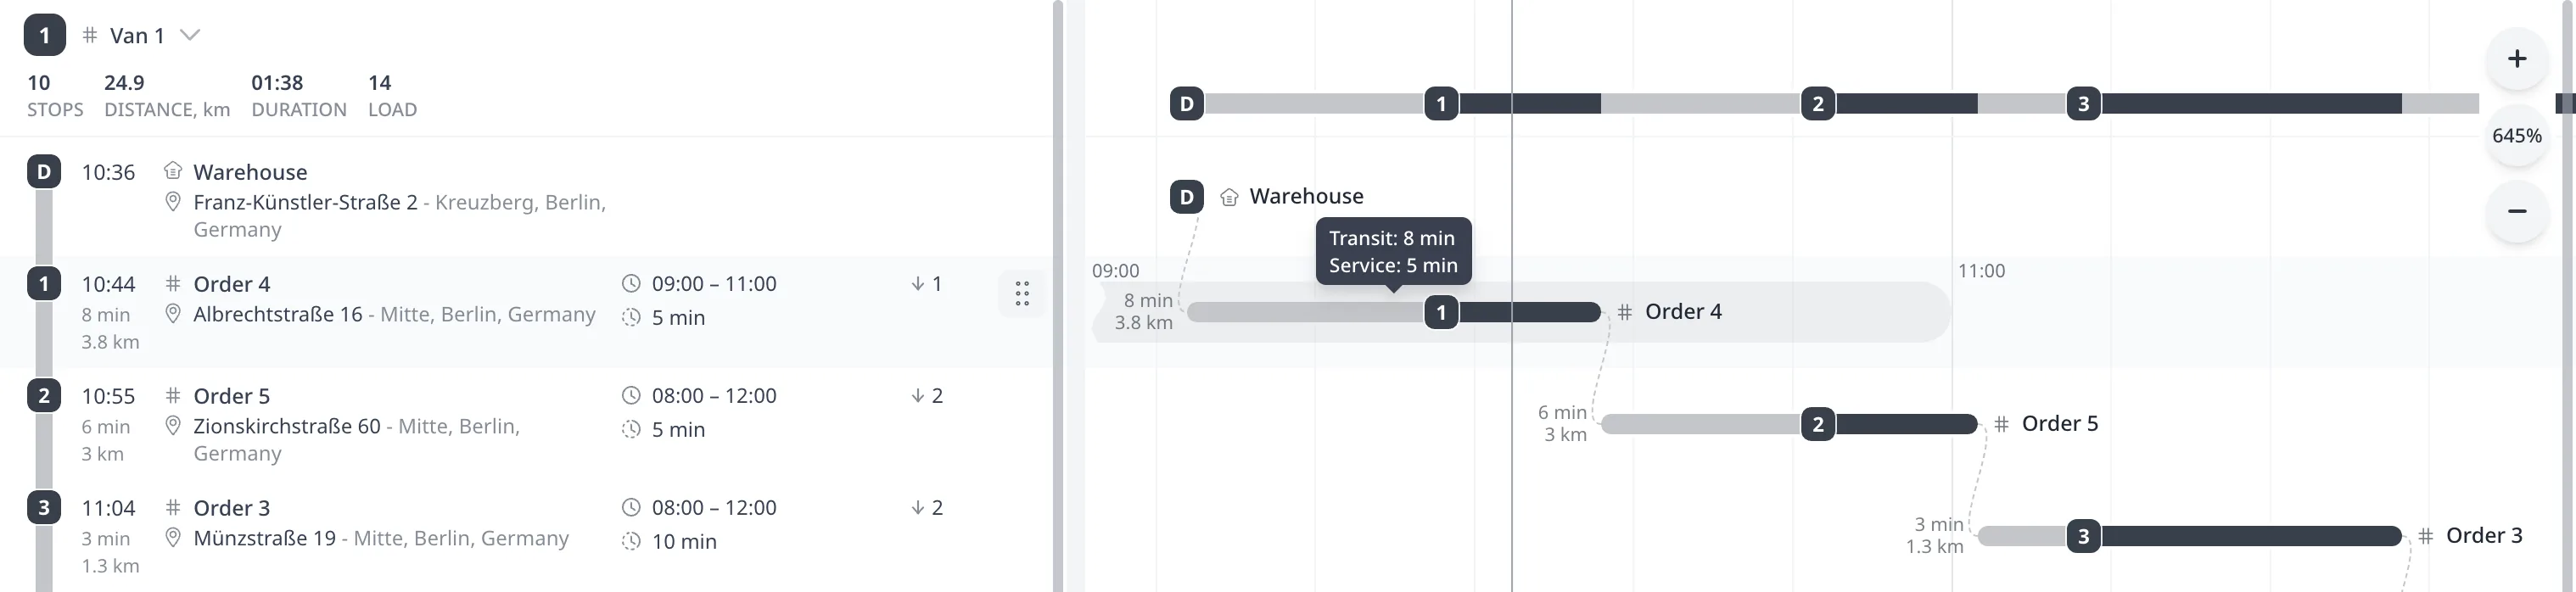
When a window extends beyond the visible time range, a wavy edge marks the clipped boundary. The lane displays that boundary's time at the visible edge. The selected stop's lane keeps its time window visible.
While the mouse is over a stop's bars or number badge, Routing24 shows its duration tooltip. This applies to both the route lane and the individual stop lane. The tooltip lists nonzero durations in this order:
- Transit
- Waiting
- Service
Each duration occupies one line. For example, in the screenshot, Order 4 shows Transit: 8 min and Service: 5 min. It has no waiting duration.
Selecting stops
A click on a stop row selects the row and scrolls the timeline horizontally until the stop's bars and labels are in view. The zoom remains unchanged.
A click on an individual stop lane selects its row. A click on a stop's bars or badge on the route lane selects its row and scrolls the list to it.
Zoom and scrolling
At 100% zoom, every route fits within the timeline's width. The zoom range is 50% to 6400%. Zoom in multiplies the zoom by 1.5 per press. Zoom out divides it by 1.5 per press.
The zoom percentage opens a menu with Fit, 50%, 100%, 200%, and 400%. Fit fits every route within the timeline's width. Reset view restores 100% zoom.

The timeline supports these mouse and trackpad inputs:
| Input | Effect |
|---|---|
| Wheel over the lanes | Scrolls the routes list and timeline vertically together |
| Ctrl + wheel | Zooms around the time under the mouse |
| Trackpad pinch | Zooms around the time under the mouse |
| Wheel over the time scale | Zooms without Ctrl |
| Shift + wheel | Scrolls the timeline horizontally |
| Sideways swipe | Scrolls the timeline horizontally |
| Drag on a lane | Moves the timeline horizontally and the list vertically |
Ctrl + wheel and trackpad pinch keep the time under the mouse fixed. One wheel notch changes the zoom by 15%.
When zoomed in, the horizontal scrollbar scrolls the timeline. The timeline keeps its horizontal position while the routes list scrolls vertically.
Manual editing
Timeline view supports the same stop dragging, undo, redo, and route menus as Map view. After a manual edit or another optimization, the lanes show the updated times.
When a stop from the list is dropped onto the timeline, Routing24 removes it from its route. Routing24 places the stop in a card at the drop point, as with a drop onto the map. During a drag between stop rows, the insertion line extends across the timeline.
The editing operations are described in Edit routes manually: drag, split, merge.
Availability and saved view
In a window narrower than 744 pixels or shorter than 500 pixels, the Optimize page does not show Map view, Timeline view, or Reset view. Without a routing plan, the timeline is blank.
Routing24 does not store the selected view. After a page reload, the page shows Map view.
Next step
For plan metrics, route statistics, and stop details, see Read the routing plan: ETAs, distance, load.
FAQ
Why is Timeline view unavailable or blank?
Timeline view requires a window at least 744 pixels wide and 500 pixels high. In smaller windows, the Optimize page does not show the view controls. Without a routing plan, the timeline is blank. Run an optimization to produce a routing plan. Timeline view is available on every tier.
How do I see a stop time window and service duration?
Move the mouse over a stop row or its timeline lane to display the time window. The selected row keeps its window visible. Move the mouse over the stop's bars or number badge to display the durations for transit, waiting, and service that last longer than zero.
How do I fit every route into the timeline?
Reset view restores 100% zoom, which fits every route into the timeline width. The zoom percentage also opens a menu with Fit, 50%, 100%, 200%, and 400%. A click on a stop row in the list scrolls its bars and labels into view without changing the zoom.